The remote display application is included free with AmigoPOS 8 and is intended to replace the prep printer. Each prep printer can be replaced, or work in conjunction with a single remote display monitor. Each PC can support up to 5 monitors, with each monitor corresponding to a prep printer. When using bump bars (programmable keyboards), each monitor should be driven by a separate bump bar, so that 5 monitors on a single PC will use 5 bump bars connected to the same PC.
Typical System
Most resellers or vendors will obtain a Mini/Booksize "Barebone" system with no operating system installed. Companies such as newegg.com offer many choices. Select a system that contains a sufficient number of VGA or hdmi outputs with on-board lan and a dual-core Atom. The inexpensive Windows 7 Starter edition can be used (only available in 32-bit) or Windows 7 64-bit (any edition) can be used for slightly better performance. Windows 7 64-bit is recommended when using more than 3 monitors. In addition, verify that there are enough USB outputs to connect the bump bars/programmable keyboards. If not, obtain a USB hub. For best results, do not use wireless networking.
Any monitor can be used. Higher screen resolutions use more system resources but offer crisp text at a distance. The remote display application will automatically resize to any screen resolution and offers the ability to customize the text size for each monitor.
System Requirements
Supported Operating Systems: Any version of MS Windows that supports .Net 4.0. Windows 7 recommended. The remote display application has not been tested on embedded operating systems
Processor: 400 MHz Pentium processor or equivalent (Minimum); 1GHz Pentium processor or equivalent (Recommended). The remote display application will run on inexpensive atom mini computers and older Celeron processors.
RAM: The remote display application consumes 32-64MB Ram depending on the number of monitors. The minimum memory requirements are determined by the operating system. In practice, 2GB is sufficient for a dual-core processor running Windows 7 64-bit.
Hard Disk: Up to 50 MB of available space may be required
Display: 800 x 600, 256 colors (Minimum); 1024 x 768 or better high color, 32-bit (Recommended)
Video Card: Any integrated or external graphics card capable of driving 1 to 5 monitors.
Screen Resolution
The remote display application will automatically resize to fill the entire viewable area of the screen at program startup. Although it is capable of running at resolutions as low as 800x600px, 1024x768px or higher is recommended.
Available Monitors
The available monitors are determined by the operating system. Click the Settings button to verify that the remote display application has detected all connected monitors.
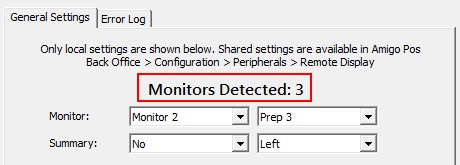
Monitor Detection on the Settings Screen
In the image below, 3 monitors are connected (as shown in the Windows Control Panel | Display Properties). After connecting the monitors, select Extend desktop to this display for each additional monitor as shown below.
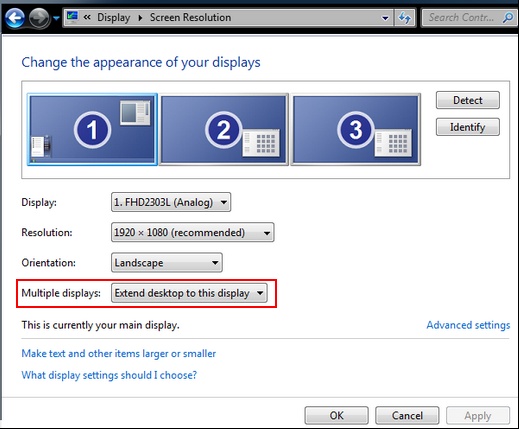
Windows Control Panel | Display | Screen Resolution
Installation
The remote display application is installed with AmigoPOS. A shortcut to the application is added both to the start menu shortcuts and desktop shortcuts folder.
Configuration
Enable the remote display on any computer running back office by navigating to Back Office | Settings | Devices | Remote Display and setting the value for Enabled to Yes. The Enabled setting can be set once at any pos stations and is shared by all pos stations. In addition, all screen and text appearance settings are shared by every remote display on the system.
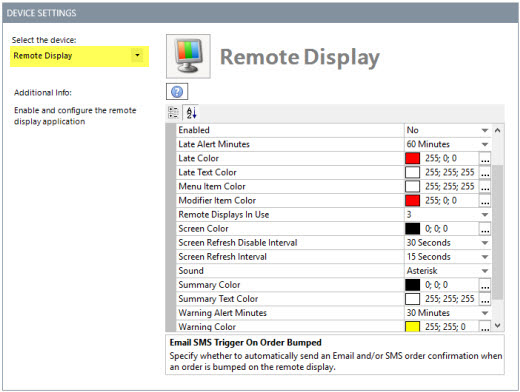
Back Office Settings
Enabled: Set to Yes to enable remote display(s)
Late Alert Minutes: Minutes before late alert color is used (set to 0 to disable)
Late Color: Late alert background color. Is used to replace the order type background color when an order is late.
Late Text Color: Late alert text color. Is used to replace the order type text color when an order is late.
Menu Item Color: Remote display menu item text color
Modifier Item Color: Remote display optional text color
Screen Color: Background color for remote display main screen
Screen Refresh Disable Interval: Time in seconds to pause screen updates when the Previous, Next or Lock button is pressed
Screen Refresh Interval: Time in seconds to pause between screen updates
Summary Color: Background color of summary view
Summary Text Color: Ticket color of summary view
Warning Alert Minutes: Minutes before warning alert color is used (set to 0 to disable)
Warning Color: Warning alert color for remote display main screen
Warning Text Color: Warning alert text color for remote display main screen
Remote Displays In Use: Enter the highest remote display id. This value is used to speed up order submission, similar to disabling prep printers that are not in use.
Sound: System sound to play when a new order is added to the list
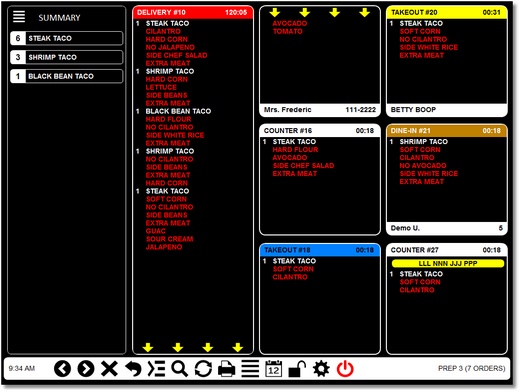
Remote Display Main Screen
For example, the settings for the screen above are:
Late Color: Red (shown in order #10)
Late Text Color: White (shown in order #10)
Menu Item Color: White
Modifier Item Color: Red
Screen Color: Black
Summary Color: Black
Summary Text Color: White
Warning Color: Yellow (shown in order #20)
Warning Text Color: Black (shown in order #20)
Remote Displays In Use: Enter the highest remote display id. This value is used to speed up order submission, similar to disabling prep printers that are not in use.
Sound: System sound to play when a new order is added to the list
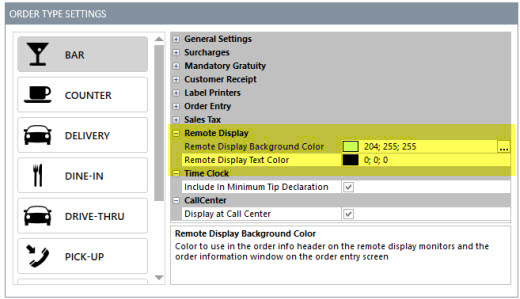
In addition, each order type is assigned both a background color and text color on the order types settings screen. In the image above, the COUNTER order type is shown with a white background and black text.
Remote Display Main Screen
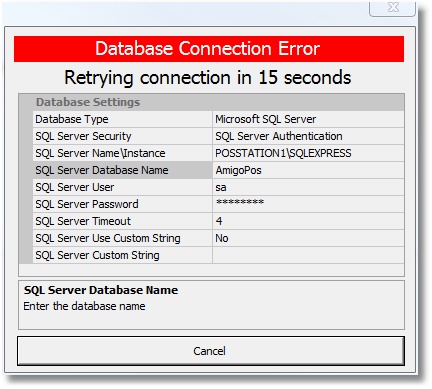
Follow the procedure to set the SQL Server connection string to connect to the database. The remote display application will use the same database settings as AmigoPOS. AmigoPOS does not have to be running when the remote display application is in use. If a database connection error occurs, a dialog appears and the connection will be automatically every 20 seconds. If a database connection error occurs, verify that the network is up and that the PC hosting the database is online.
Database Connection Error
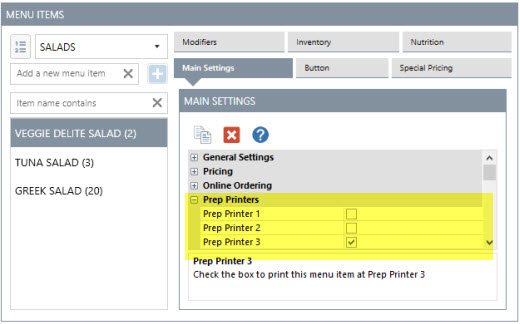
Each monitor is assigned a prep id, which corresponds to the Prep1, Prep2, etc fields in AmigoPOS Back Office menu configuration screens.

Remote Display Settings Screen
For example, the menu item shown in the image below is sent to any monitor designated as Prep 3.
The menu item will appear on any monitor designated as Prep 3
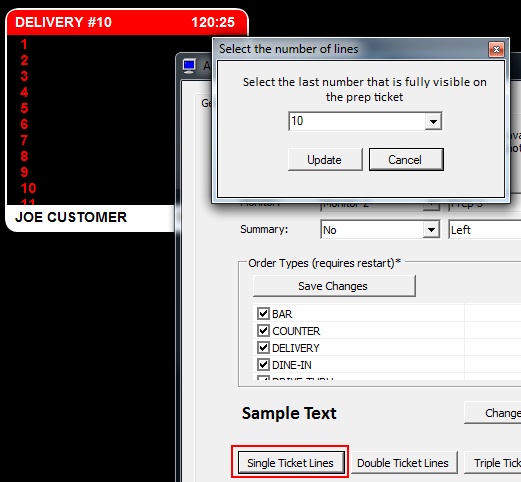
The text size, weight and font name can be customized for each monitor. Open the remote display settings screen and select the monitor from the drop-down list. Click the Change Text box and select the font name and style. Note that any font style other than Regular will be interpreted as bold font. The number of lines that appear on a prep ticket is determined by the font size and screen resolution. After the font is selected, click the Single Ticket Lines button and select the highest number that appears on the screen. For example, in the image below, only 10 lines are fully visible (the 11th line is obscured). Repeat this process for the Double and Triple Ticket Line buttons. Note that if an order is too long to appear on a triple length ticket, yellow arrows will appear at the bottom indicating that the remaining order items appear on the next ticket(s), as shown for order #10 in the 2nd image above. Additional settings include the ability to display specific order types and the ability to automatically display the summary screen at startup.
Setting the Number of Visible Lines
Usage
Each remote display function is assigned a shortcut keys (or keystroke combination), but the display can also be used without a keyboard if a touchscreen monitor is used. Refer to the bump bar help topic for shortcut key assignments.

On-Screen Buttons
On-Screen Buttons
1.Right Arrow: Select previous ticket
2.Left Arrow: Select next ticket
3.X: Bump ticket (order complete/remote from list)
4.Back Arrow: Un-bump the last ticket that was bumped
5.Right Arrow List: When more tickets are available than can be displayed on the screen at one time, move to next group of tickets
6.Zoom: Show details for the selected order. This feature is not available on the current release.
7.Refresh: Check for new orders and update the screen
8.Print: Reprint prep ticket. This feature is not available on the current release.
9.Summary: Show a list of menu items currently in the queue
10.Scheduled Orders: Show a list of orders that are scheduled for a future date/time. Scheduled orders are currently only available for the web ordering interface.
11.Lock Screen: Temporarily prevent the screen from refreshing
12.Settings: Show the settings screen. The same settings are available in back office at any pos station, with the exception of the Remote Display Id, which must be set locally
13.Exit: Shut down the remote display application
The image below is an example of a remote display monitor with 13 orders in the queue. The status displayed at the bottom indicates that the display is designated as Prep 3 and there are 13 orders in the queue but only 9 are visible. The summary at the left displays the total items for all orders, including the orders that are not visible on the screen. Nine orders are shown, but hiding the summary will show up to 3 additional orders. Press the right arrow button to view the remaining orders. Press the right arrow button a second time to return to the first screen.
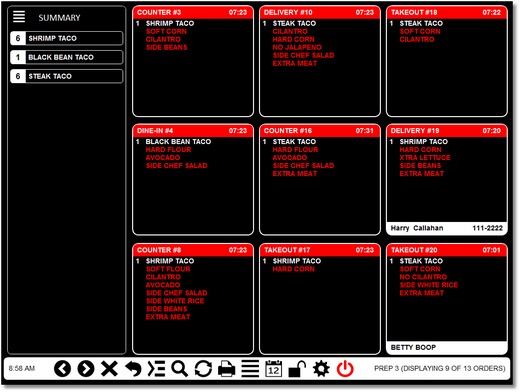
Example with 9 Visible Orders & Summary
Press the summary button to hide the summary and display 3 additional orders on the screen. Note that the status shown at the bottom indicates that one order is not visible (12 of 13 are visible).
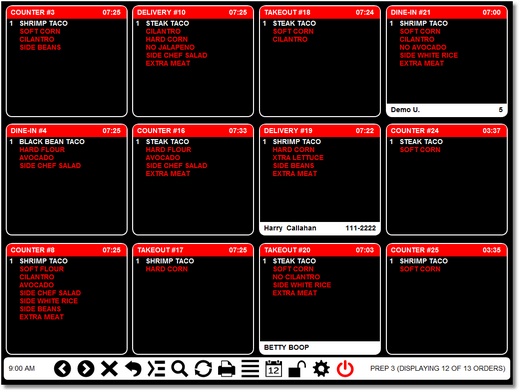
Remote Display with 12 Orders & No Summary