Although a keyboard or touch monitor can be used, a programmable electronic keyboard, membrane keyboard or bump bar is recommended for reliability and ease of use. Bump bars are generally very durable and spill resistant with extra large membrane buttons. A keypad/bump bar with 30 or more keys (or 15 keys with a configurable Shift button) is recommended to accommodate new functions as they are released.
Referring to the keypad's programming guide, use the following chart to program the required keystroke combinations:
|
Function |
Description |
Monitor |
||||
|
1 |
2 |
3 |
4 |
5 |
||
|
Select Previous Ticket |
Ctrl+Up |
Ctrl+Alt+Up |
Ctrl+Shift+Up |
Alt+Shift+Up |
Ctrl+Winkey+Up |
|
|
Select Next Ticket |
Ctrl+Down |
Ctrl+Alt+Down |
Ctrl+Shift+Down |
Alt+Shift+Down |
Ctrl+Winkey+Down |
|
|
Bump Order |
Remove the selected order from the list |
Ctrl+B |
Ctrl+Alt+B |
Ctrl+Shift+B |
Alt+Shift+B |
Ctrl+Winkey+B |
|
Unbump Order |
Recall the last order that was bumped |
Ctrl+U |
Ctrl+Alt+U |
Ctrl+Shift+U |
Alt+Shift+U |
Ctrl+Winkey+U |
|
Show Next Screen |
Show the next group of orders |
Ctrl+Right |
Ctrl+Alt+Right |
Ctrl+Shift+Right |
Alt+Shift+Right |
Ctrl+Winkey+Right |
|
Show Order Details |
Display the order details |
Ctrl+F |
Ctrl+Alt+F |
Ctrl+Shift+F |
Alt+Shift+F |
Ctrl+Winkey+F |
|
Refresh Screen |
Ctrl+R |
Ctrl+Alt+R |
Ctrl+Shift+R |
Alt+Shift+R |
Ctrl+Winkey+R |
|
|
Print Order |
Not yet implemented |
Ctrl+P |
Ctrl+Alt+P |
Ctrl+Shift+P |
Alt+Shift+P |
Ctrl+Winkey+P |
|
Show Summary |
Show a list of all items and the quantity of each item |
Ctrl+Q |
Ctrl+Alt+Q |
Ctrl+Shift+Q |
Alt+Shift+Q |
Ctrl+Winkey+Q |
|
Show Future Orders |
Show orders that are scheduled for a future date/time |
|||||
|
Lock/Unlock Screen |
Disable auto-refresh |
Ctrl+A |
Ctrl+Alt+A |
Ctrl+Shift+A |
Alt+Shift+A |
Ctrl+Winkey+A |
|
Show Settings |
Ctrl+S |
Ctrl+Alt+S |
Ctrl+Shift+S |
Alt+Shift+S |
Ctrl+Winkey+S |
|
|
Shut Down |
||||||
|
Select Order 1-12 |
The shortcuts to select individual orders on screen |
F1-F12 |
Alt+F1-F12 |
Shift+F1-F12 |
Ctrl+F1-F12 |
Winkey+F1-F12 |
Programming Example
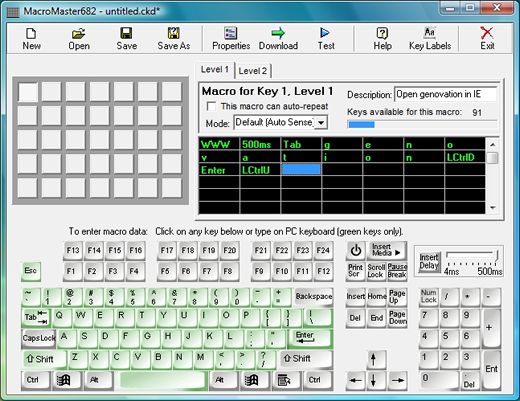
When configuring a generic programmable keypad, such as the Genovation ControlPad 682, connect the keypad to any PC and install the manufacturer provided programming utility. The MacroMaster programming utility allows the user to easily program a keystroke combination (macro) for each key so that the key can trigger a specific action in the remote display. Since the keypad in this example contains more keys than required by the Remote Display application, keys can be made double height or width for easier access. The Genovation 1x2 Relegendable Key Caps are used to combine 2 keys into a single key and can be used either vertically or horizontally. Frequently accessed functions (F1-F12 order selection, Bump, Un-Bump) can be assigned to two keys that are covered by the 1x2 plastic keycap.
*Installing the programming utility on the Remote Display computer is not required. The keypad can be programmed from any Windows PC and will retain the settings when connected to a different computer. Click here to download the configuration file used in the example below.

Genovation MacroMaster Programming Utility
|
Begin by programming the order selection shortcuts 1-12. In the example below, the top left key is assigned to order #1. Click the F1 button on the screen to add the keystroke to the list that will be sent whenever the key is pressed. Enter a user friendly description and click Save. If you are using key caps for double-sized keys, repeat the process for the adjacent key.
|
Advanced Configuration
By default, orders are first selected with a single keystroke, then bumped with a second single keystroke. Some users may wish to program a macro that sends the Select and Bump commands with a single keystroke, but allows the user to select the order (without bumping) by pressing Shift followed by pressing the order key. Each system presents a unique set of requirements and the keypad can be programmed to minimize the number of keystrokes for the prep staff and achieve maximum efficiency.