Complete the following steps only after your merchant account provider or authorized Datacap NETePay reseller has installed and tested Datacap NETePay on one pos station. Install Datacap NETePay on the main pos station, usually the same pos station that runs the database server.
Note that Datacap NETePay must be obtained from an authorized vendor or merchant account provider. AmigoPOS does not sell or install Datacap NETePay.
Settings
Open Back Office | Settings | Credit
Cards to display the setup screen. All settings on this screen
are local and must be set at each pos station and back office workstation
that is used to process credit card transactions.
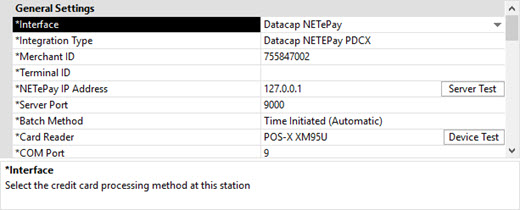
Interface: Select Datacap NETePay from the drop-down list.
NETePay Merchant ID: Enter the merchant id as shown on the NETePay setup screen
NETePay Batch Method: Currently, only automatic batch settlement is supported, where the payment processor settles the batch automatically. If your merchant account requires manual batch settlement, use the NETePay Administrator application to settle the batch.
NETePay Server IP: Enter the IP address of the workstation running NETePay. If NETePay is running on the same pos station, use the IP address 127.0.0.1. Otherwise, use the IP address of the pos station running NETePay, which can be found by typing IPCONFIG at a Windows command prompt on the pos station running NETePay, as shown below. This address can also be determined by viewing the client list in your network router's web interface.

NETePay Server Port: Enter the IP port of the workstation running NETePay. The default port for NETePay is 9000.
NETePay Card Reader: Select the device used to swipe credit cards at this pos station. A list of compatible devices is available here. The following devices are supported in the current release:
NETePay COM Port: Select the virtual COM port assigned to this device. This setting is only used for devices that are assigned a virtual COM port by the device driver, such as the Datacap PDC.
NETePay PIN Pad Type: Select the type of PIN Pad attached to the card reader.
Refer to the Mercury Pay back office setup topic for a description of additional fields.