AmigoPOS includes a comprehensive delivery module with the ability to track delivery orders by custom phone number. The simple 3 step process handles the delivery from start to finish; the last two steps can be skipped if your business does not:
Step 1 - Submit Order: Enter the order by selecting the Delivery order type under the New Orders button group on the main screen
Step 2 - Check-Out Driver: To send the driver on a new delivery trip, open the Deliveries screen, select the driver and assign one or more orders to the driver to print a trip summary
Step 3 - Check-In Driver: When the driver has returned, return to the Deliveries screen and select the driver to check-in or settle the delivery orders
Customers are tracked by phone number, enabling the system to recognize a customer from caller-id data. In addition, a customer may have an unlimited number of locations and phone number assigned so that the customer's orders can be tracked regardless of the delivery address.
The primary customer information includes:
- First Name
- Last Name
- Email address
- Send Offers: Allow email offers to be sent. For users that wish to reduce spam and ask the customer for permission to send email
- Tax Exempt: Set this value to true to mark the entire order as tax exempt, regardless of order type
- Loyalty Card # (For the upcoming loyalty card features)
- Customer Since: Date of the customer's first order
Each customer definition must have at least one location assigned. Each location's information includes:
- Customer Id: The unique customer id generated when the customer's primary is first saved
- Location Name: A unique name identifying the location (i.e. home, work, etc)
- Phone number
- Phone Extension: Numeric phone extension. This allows company/office complex order tracking where the same phone number may have many different extensions. Note that the company name can be used in place of the customer name in the customer's primary information.
- Street Number
- Street Address
- Street Address (2)
- City
- State/Province
- Postal Code
- Additional Notes:
- Delivery Zone
Many options can be enabled on the Order Type setup screen in Back Office | Settings | Main Settings by clicking the Order Types tab. Additional settings are available by clicking the Deliveries tab. Review the Order Types help topic for additional information.

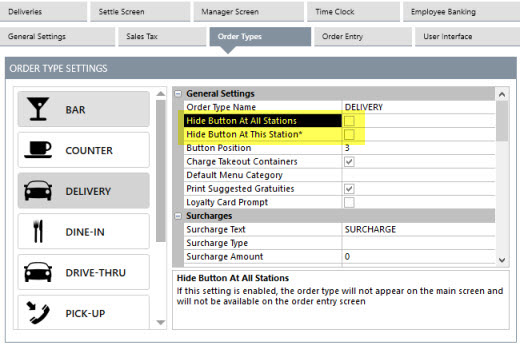
Open the order type configuration screen in Back Office | Settings | Main Settings and verify that the box next to the Show Phone Number field is checked next to the Delivery order type to prompt the user for the customer's phone number. Press enter (or use the record navigator to change rows) to update the database.
The customer phone number must be configured for your area. Some areas in the United States of America use multiple are codes in a small area. If this is the case, select a phone length of 10 (3-digit area code + 7 digit-phone number). Similarly, many mobile phone numbers in Europe have a different area code than the local area code, in which case the phone number length should be adjusted to allow for the area code to be entered. In some areas of Europe, the mobile and land line numbers may use a different number of digits. In that case, enter the length of the longer number and use leading zeros to compensate for the shorter number on the order entry screen (or disable phone number verification to allow phone numbers of any length).
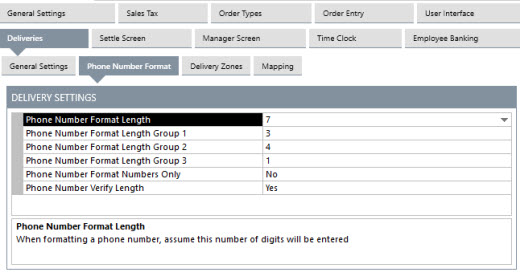
To force the user to enter the number of digits defined by Phone number length whenever a phone number is entered (recommended), check the box next to Verify phone number length. If phone number formatting is enabled. adjust the phone number groups so that the phone number is formatted correctly with a dash between each group of numbers.
Delivery zones provide an easy method of charging different delivery rates depending on the customer. Each customer location can be assigned a different delivery zones. Delivery zones are added on the customer information screen and are modified in Back Office | Settings | Main Settings | Deliveries. At least one (enabled) delivery zone is required, even if the zone charge is set to zero.
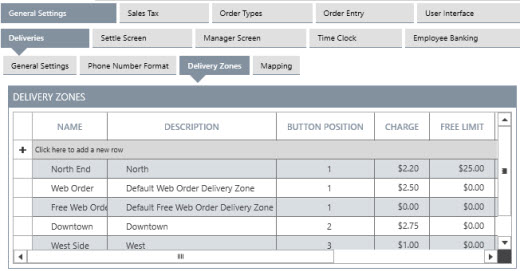
A new delivery zone is added in Back Office | Settings | Main Settings | Deliveries | Delivery Zones by entering the name/description/charge on the top line and pressing the Enter key.

If caller id is enabled on the local pos station, a list of the 25 most recent calls appears on the right side of the screen. Select a caller id entry and press the CONTINUE button to look up the customer.

If the customer has ordered previously with the phone number, the previously customer information will appear. Make any necessary changes and press ACCEPT to start the order. If the customer has never ordered before, enter the required information and press ACCEPT to continue or CANCEL to skip this step. For customers that order the same items regularly, press the VIEW PREVIOUS ORDERS button to view a list of the customer's previous orders. A previous order can be reordered by selecting the order from the list pressing the REORDER button. Orders are listed by date with the most recent orders at the top of the list. The new order appears on the order entry screen where any changes can be made.

An additional customer location is added by pressing the green button next to the existing customer locations list. Enter at least the location name and phone number and press SAVE to continue or CANCEL to return to the customer information screen. Note that an additional customer location cannot be added until a new customer's primary location data is saved.

After an order is started, the customer information can be accessed or changed by pressing the INFO button followed by the EDIT CUSTOMER button on the order entry screen.