Many manufacturers provide OPOS (Ole for Point of Sale) drivers for point-of-sale hardware. AmigoPOS currently provides support for many OPOS scanners and scales. OPOS provides a device driver architecture that allows point-of-sale hardware to be easily integrated with AmigoPOS where OPOS controls handle communication between compatible hardware and AmigoPOS.
*The next help topic contains specific instructions for Avery Berkel, NCI, Weigh-Tronix 6710 or similar scale.
An OPOS control consists of two parts:
1.Control object: The control object for a device class (such as line displays) provides the interface for the software program. A standardized set of OPOS control objects—known as the Common Control Objects—are provided with AmigoPOS and can be used with most devices.
2.Service object: The service object provides communication between the software and the device. Typically, the service object for a device is provided by the device manufacturer. Install the service object by inserting the device CD into the disk drive on the computer. Then follow the on-screen instructions.
The following example descriptions the installation and setup of a Metrologic Stratos 2320 Scale/Scanner using a single RS232 cable to communicate with the host PC. Many other manufacturers offer scale and scanner OPOS drivers , including Avery Berkel, Symbol and Datalogic.
Installation is described in 3 steps:
- Device Configuration
- OPOS Configuration
- AmigoPOS Configuration
1. Download and install the manufacturer's setup utility

The Metrologic Metroset® 2 configuration utility
2. Select the device and click the Configure button

The left menu displays available options after the device is selected
3. Select the correct port from the Com Ports menu button. You may then upload the device's current configuration by clicking the Upload button. If an error occurs during the upload process, check the Com Port settings in Windows device manager and attempt to connect to the device using HyperTerminal.

Compare the settings with the port settings in the Device manager
4. Click Primary Port to view the device's port settings. The settings should correspond to the port settings in Windows Device Manager.

The barcode configuration screen
5. Click Code 39/93 under the Code Types category. Check the box to enable the scanner to decode Code 39 barcodes. Code 39 barcodes are used on AmigoPOS customer receipts

Specify the cable type
6. Click the scale I/O button and check the box to enable Single Cable Scanner/Scale operation. This allows the host to communicate with both the barcode scanner and scale over a single RS232 cable. If your configuration uses 2 RS232 cables, this box should be left unchecked.
7. To complete the scanner configuration, select File - Print Configuration Barcodes. Disconnect the scanner/scale from the serial port, scan the barcodes in the order printed and restart the device.

Select the scale model
1. Download and install the Metrologic OPOS configuration utility.(MetrOPOS). Run the utility and select the Stratos/2020 from the list that appears on the configuration wizard.

Select the cable type
2. Select Single-Cable as the Scale Type and click Next
")
Enter a name for the device(s)
3. Enter a user friendly name for both the barcode scanner and scale and click Next

Uploading new settings to the device
4. Allow 1-2 minutes for the utility to program the device. Do not interrupt the process

Testing the integrated barcode scanner
5. Test the barcode scanner and click Next

Testing the scale
6. Test the Scale and click Next

Modifying the settings of a previously configured device
7. If errors occur during testing, click the Modify Profile button and make any necessary changes. Click the Save button followed by the Program button to send the new settings to the device.
1. Open Back Office | Settings | Devices and select Yes next to Enable this device on this pos station and enter the device name used above (Step 3).

Back Office | Configuration | Peripherals

Counter Scale Configuration
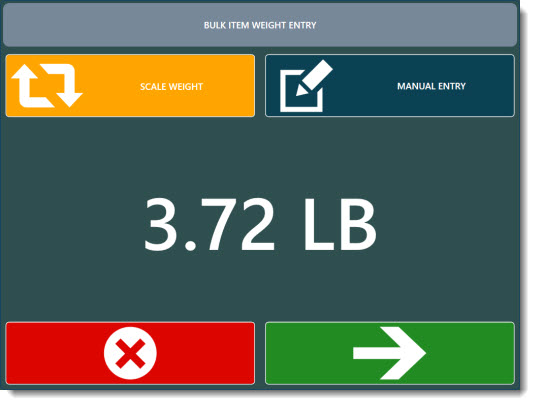
2. Open the order entry screen and select press a bulk menu item button. A prompt will appear directing the user to place the item on the scale. Press the green arrow to add the item to the order.